
Tips on Photographing a Quilt for Show Submission
by Laura Loewen

You’ve spent hours making your quilt and now it’s time to submit to a show. Photographing your quilt for digital submission may be the most important step. A good, or bad, photograph may make the difference if your quilt is selected or not for the show you are entering.
You don’t need a professional grade camera to take a great photograph of your quilt. You just need a little TLC when it comes to creating a photo shoot for your masterpiece. We all love seeing quilts in the wild and put into interesting compositions on social media like Instagram and Facebook. However, the tips below will help you create simple, clean photographs that are best for submitting when entering a quilt show.
TIP 1 – LEAVE TIME FOR PHOTOS
Set yourself a deadline before the entry deadline. Leave yourself time after finishing your quilt to take the photographs that you want and need for submission. If you know you only have time on the weekend, make sure to schedule it. Also, if you know you don’t have an indoor space available with good light, make sure you leave room for any inclement weather delays.
TIP 2 – TAKE THE PHOTO
Use the camera you have! Almost everyone has a camera in their purse or pocket these days. You don’t need a professional camera to make a great photo. Make sure your camera lens is clean and free of dirt or fingerprints that could obscure the image.
TIP 3 – LIGHTING
Use daylight for the best results. Select a place outside, or inside near a large door or window, that is not in direct sunlight. An overcast day or a bright shady spot is best. Be aware of the angle of sunlight and any shadows that may be created.
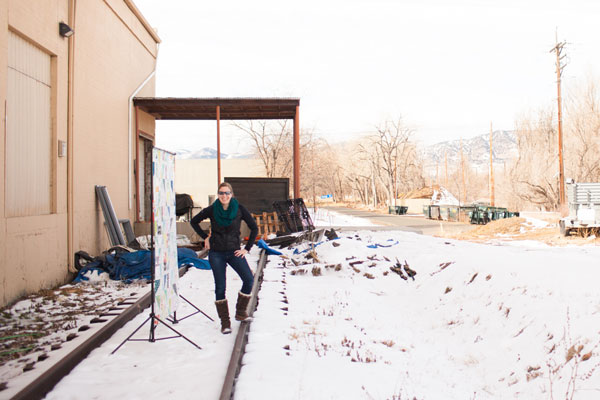

For my photo shoot, I set up on the north side of my husband’s office building. Make sure you have permission to take photos in your selected location. Note; the train tracks next to this building span approximately 100 yards and are not connected to any other tracks. NEVER take photos on active train tracks.
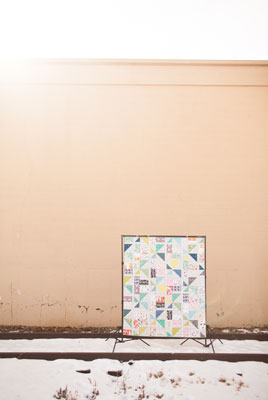
Make sure the light source is not coming from behind the quilt or you could end up with sun flare. This is a nice effect when taking casual or artistic photos but it is not desirable for submission photos.
Master tip:
If you don’t have access to daylight, or have issues with weather, you can create a lighted indoor space using utility lamps and daylight temperature light bulbs. Try hanging large sheets of sheer white fabric in front of the utility lamps to diffuse the light or reflecting it off of a pure white wall or poster boards. Be careful not to get objects to close to lamps and start a fire.
TIP 4 – HANGING

Hang the quilt straight. If the show requires a sleeve, you’ve already got a nice way to hang your quilt. Otherwise, tack it to the side of a building or use strips of fabric and safety pins to create tab tops on the back to hang the quilt from. You can use a photo backdrop rig, or just as easily use a dowel rod or curtain rod with a couple friends to hold it up.

Master tip:
Make sure to check that the bottom of the quilt is also hanging square. You may need to tack the bottom corners in place or use fabric tabs secured with safety pins to pull the corners out, somewhat like you would stake out a tent.
TIP 5 – THE MONEY SHOT
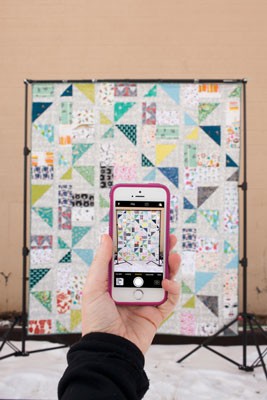
You will almost always need to submit a full, overall photograph of your quilt. Stand square to your quilt with camera lens centered on the quilt center. Look through your viewfinder or at your screen and try to square up the edges of your quilt with the edges of your screen. If you see distortion on the screen, it will show up on the photo.
Wide angle lenses will create more distortion. However, most consumer cameras, including phone cameras, do not offer a high resolution zoom option. It is most likely just cropping the image and not actually gathering more data. Try stepping away slightly if you see too much distortion because it will likely occur closer to the edges. You can crop the image yourself in post processing; don’t let the camera crop it by zooming.
TIP 6 – TAKE MORE PHOTOS
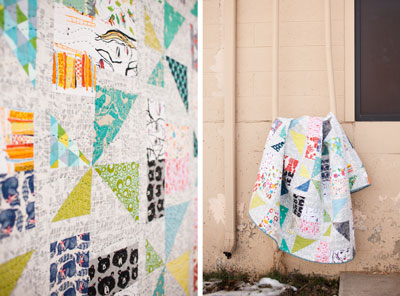
Some shows request multiple photos of your quilt. Don’t forget to get detail shots of the quilting and the piecing. You can take more artistic freedom with angles and composition for detail photos. Make sure you are still aware of your light source and any bright spots or shadows that may be created.
If multiple photos are accepted for show submission, this is when you may want to show off something more artistic like a draped or folded quilt photo. Be sure to carefully read any show submission guidelines.
TIP 7 – POST PROCESSING IS A MUST
Your computer probably came with basic editing software that allows you to crop your photo and do some minor adjustments. A decent free program you can download to your computer if you want to do basic edits is Irfanview.
If you are using your phone to take photographs and want to edit right on your phone, I like the app VSCO. The basic editing options are free. I do not recommend using preexisting filters.
TIP 8 – EDITING YOUR PHOTOGRAPHS
The three most important things to focus on when post processing your photos are, crop (showing only what you want to show), color (how true do the colors read), and exposure (how bright it is).
Exposure is important to show the quilt in the right light (pun intended). Make sure your whites look white and not grayed out or dingy. I have found that most images are underexposed and need the exposure increased. Make sure you don’t blow out the details in white areas of your quilt by upping the exposure too much.
Color correction is known as white balance. Generally, our camera will do it’s best to auto balance the colors but sometimes when photographing in shadow light our images may look a little blue. Warm the white balance by turning up the temperature. Whites should look white and not blue.
For cropping your overall photograph, I recommend cropping the image as close to the binding as possible. This removes any distractions from the background and focuses the view on the quilt alone.

In this example, I am using VSCO editing directly on my phone to edit the quilt photograph.
Master tip:
At the same time, we want to make sure our darkest areas are not appearing lighter than they are supposed to. You can play with contrast a bit to darken the darks and lighten the lights. Be sure to recheck your final exposure setting after changing any contrast settings.
TIP 9 – HIRE A PROFESSIONAL
If you are submitting for a show that you have worked very hard for, consider hiring a professional. There are many professional photographers, or student photographers who would take a commissioned job. Make sure to ask about usage rights. A photographer may keep the copyright and allow you to use the image(s) as you please, or there may be some restrictions. Remember, the quality of your photographs may be what gets your quilt accepted to the show you are entering.
TIP 10 – HAVE FUN
Lastly, make sure you are having fun. We all quilt for pleasure and entering shows should be the same. Just because our quilt is not selected does not mean our quilt is not well made or skillfully designed. Many shows, like QuiltCon, have so many entries they have to cut a substantial number more quilts than they accept. If entering shows ever becomes not fun, find something new to focus your energy on for awhile and try again in the future!

These tips were a guide for taking quality photos for show submission. You can also use the basic guidelines for lighting and post processing to help with your everyday quilt photos. When you aren’t submitting for a show you have much more freedom to come up with interesting compositions. Photographing quilts in the wild is a popular endeavor seen on social media now. This allows you to showcase not only your quilt, but also the scenery where you have chosen to photograph it. Remember, the goal is just to enjoy making quilts and making photos of them to share.
Laura Loewen has been sewing since she was 7 years old, and has been quilting for 20 years. After working in interior design in Chicago for many years, she attended Rocky Mountain School of Photography in Missoula, Montana to become a photographer. She owns her own photography business, Loewen Images, and is an active member and 2018 Vice President of Boulder Modern Quilt Guild.
