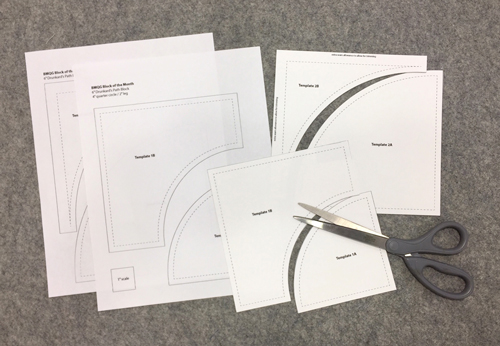
Templates. There are 2 template pages. One for each version.
Printer
Cardstock (recommended)
Paper scissors
Fabric scissors
Fabric, thread, sewing machine.
Quilters ruler and rotary cutter
Basic Curved Piecing Instructions
For the BOM, we will be using templates to make two different versions of the Drunkard’s Path block.
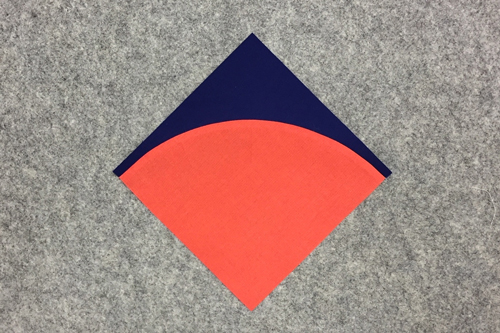
Version 1 is the more traditional form of the block where the quarter circle does not extend all the way to the edge of the block. It looks like this.
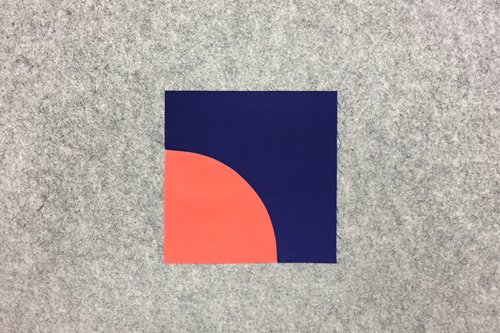
Version 2 is a quarter circle that fills the entire block. This version is made with extra background fabric and is then trimmed to size. When these blocks are sewn together, the quarter circle will go right to the edge of the block. It looks like this.
The following instructions cover the basics for making Version 2 of the Drunkard’s Path block using Template 2. The same steps are followed for Version 1/Template 1, however there is no need to trim.
Step 1 – Make Templates
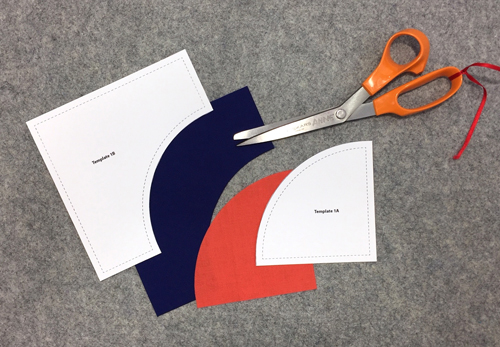
Print Template 2 at 100% (be sure the 1″ scale square on the template actually measures 1 inch when printed. Some printers don’t print a true 100%. Carefully cut out the templates on the printed lines.
Step 2 – Trace Templates onto Fabric
Transfer template shapes onto fabric by tracing around the templates using a pencil or pen. These lines will not show so don’t worry about what pen you use as long as you can see the marks.
Step 3 – Cutting Instructions
Using scissors or a rotary cutter, cut both template pieces from your fabric.
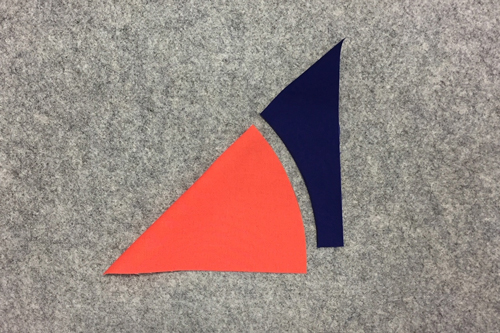
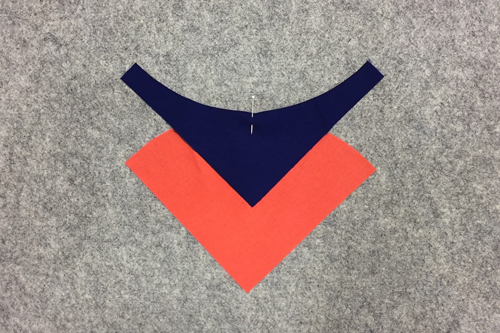
Step 4 – Marking/Pinning
Fold both the quarter circle and leg pieces in half to make a crease in the middle. Finger press or use an iron so you can easily see the crease.
Make two additional creases by folding each end in to match the crease in the middle.
With the quarter circle on the bottom, position the background piece on top, right sides together, aligning the center crease marks. Pin in place.
Match the other two crease marks and pin in place. Match the ends and pin in place. Add additional pins if you want. I prefer to add another pin in between each crease.
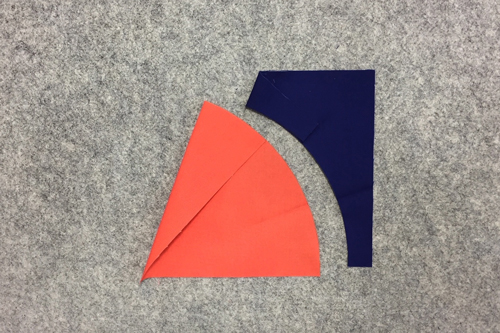
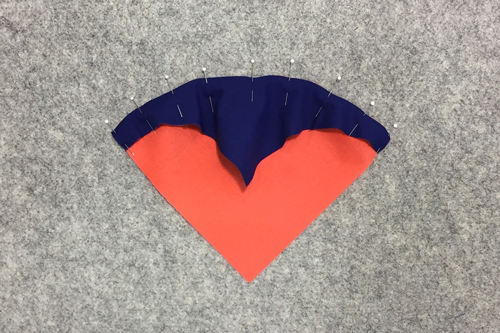
Step 5 – Sewing
With the background piece on top, sew using a scant 1/4″ seam allowance. Take it slow and ease around the curve. Lift your presser foot if necessary to smooth the fabric to avoid taking tucks. Press the seam toward the quarter circle for Template 2.
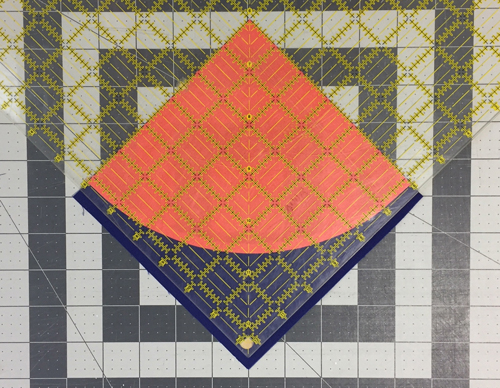
Step 6 – Trimming
For Version 2, trim to 6.5″ by aligning your ruler so there is a 1/4″ allowance beyond the edge of the curve.
Repeat the same steps for Template 1. This block is to size with no additional trimming needed.
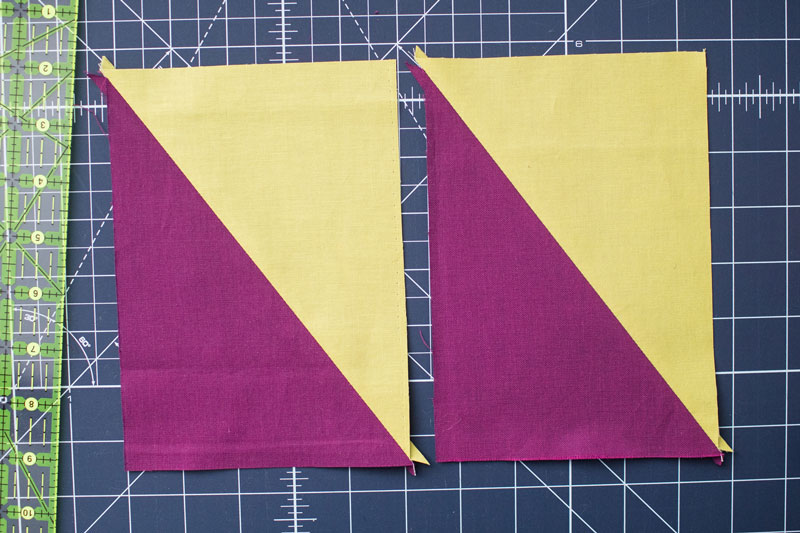
Our first month’s skill is Half-Rectangle Triangles (HRT). These differ from Half-Square Triangles (HST) because they are directional, which means the direction you sew your diagonal makes a difference in the finished unit appearance. Another difference is that you do have to do a very tiny amount of math to figure out how big to cut your starting fabric rectangles. However, the biggest departure from HST construction is that the quickest and simplest HRT method uses a template.
We will teach you how to draw your templates and figure your cutting math so that you can apply this to almost any size HRT you want to make. The block features 3 sizes of HRTs so you will have plenty of practice building your skill.
Half-Rectangle Triangle Supplies
Template paper, trace paper, or printer paper paper scissors pencil/pen ruler
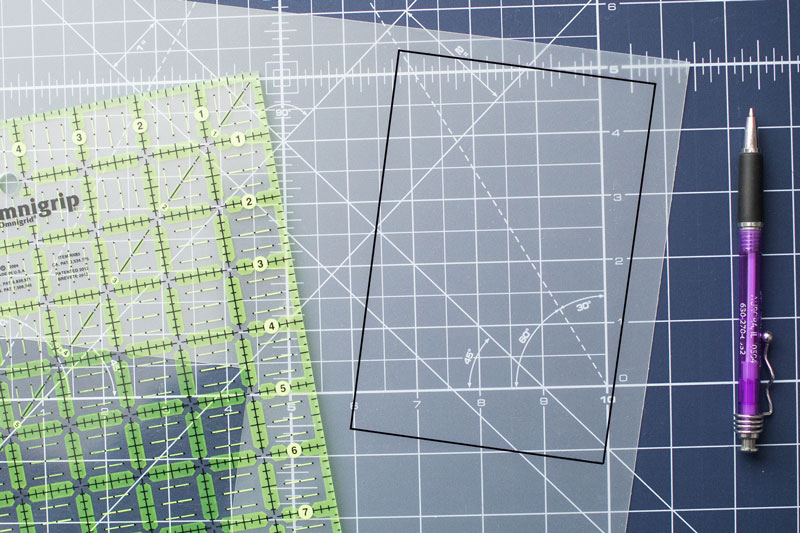
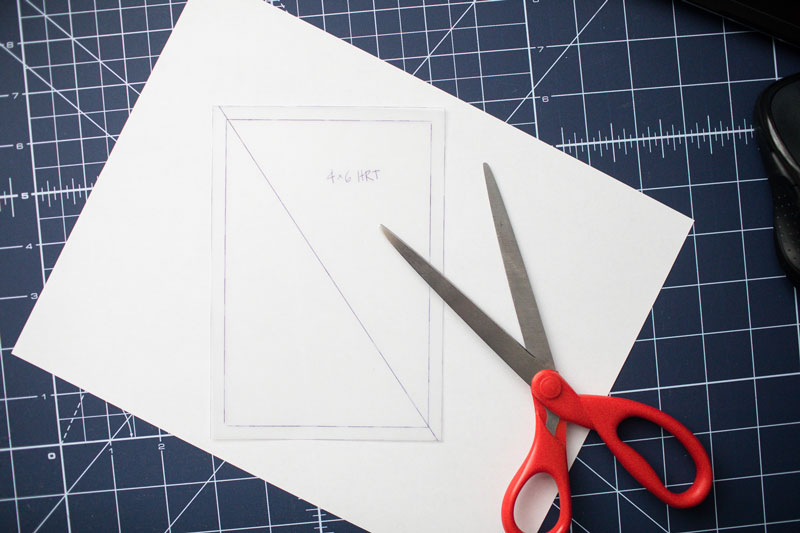
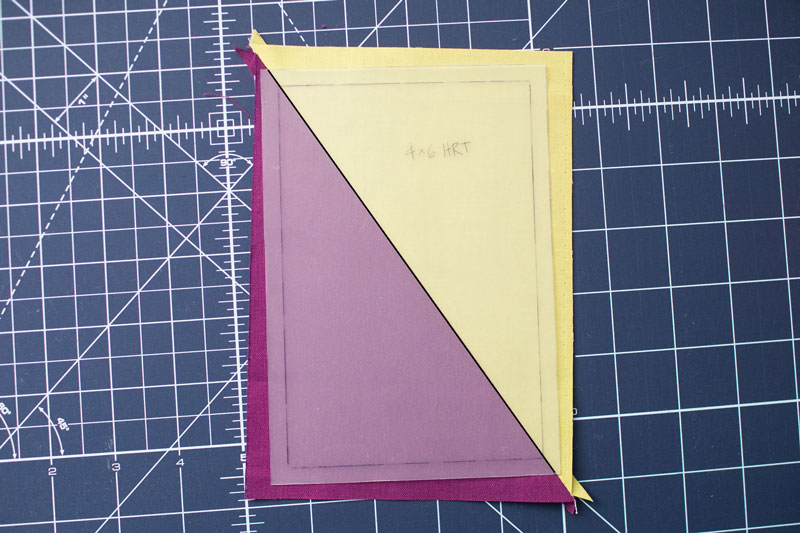
Step 1 – Make HRT Template
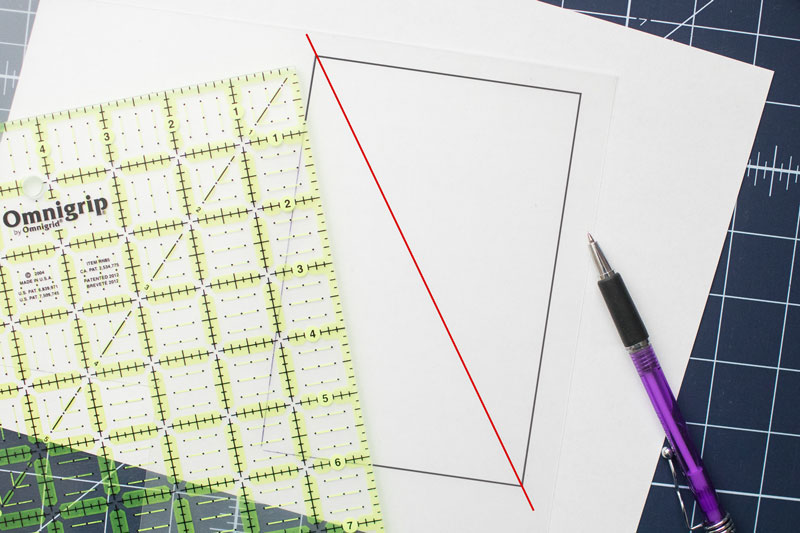
Draw a rectangle the size you want your *finished* unit to be. (Finished does not include seam allowances). Make sure to draw this rectangle at least ¼” from the edge of your template paper.
Draw a diagonal line from corner to opposite corner, extending beyond the edges. (For regular printer paper, draw 2 diagonal lines. For trace or template paper, draw one diagonal line; the template can be flipped to be reversed).
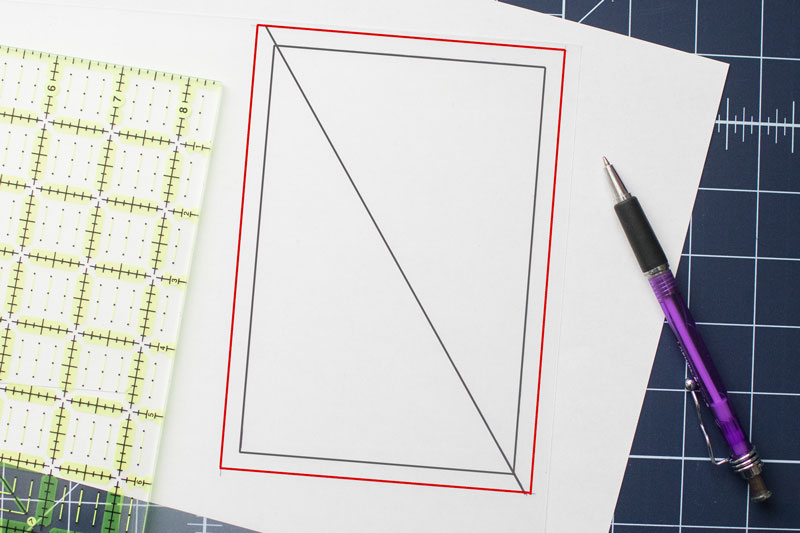
Draw the seam allowances ¼” outside the original finished rectangle. Note that the diagonal lines meet the corners of the finished rectangle exactly, they do not meet the corners of the larger, seam allowance rectangle.
Cut out the template on the seam allowance lines.
Step 2
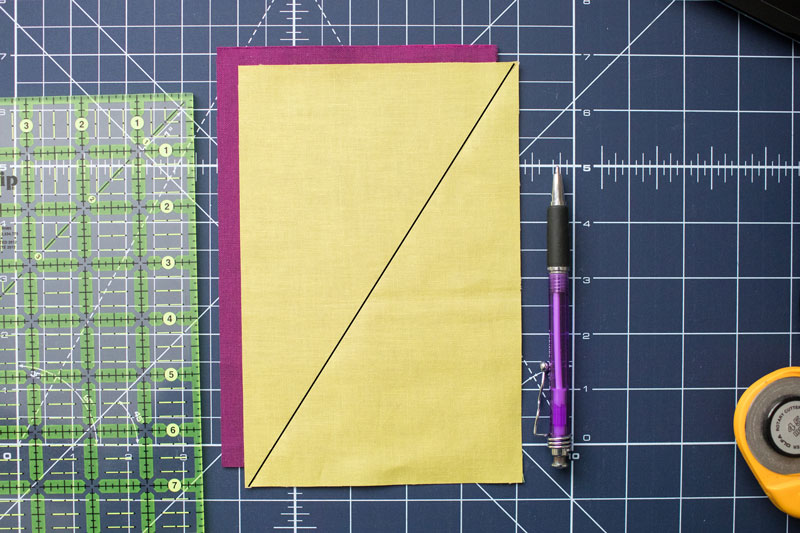
Figure starting rectangle size and cut 2 from contrasting fabrics.
Always add 1.5” to the short side. Figure the rectangle ratio and add up to 2” to the long side. Figure the ratio by dividing the larger number by the smaller number. The ratio is 1:[answer from division].
Examples:
For a finished 4”x6” HRT, cut starting rectangles at 5.5”x7.5”. Because the ratio of the rectangle is 1:1.5, only add 1.5” to the long side.
For a finished 4”x8” HRT, cut starting rectangles at 5.5”x10”. Because the ratio of the rectangle is 1:2, add 2” to the long side.
For a finished 2”x6” HRT, cut starting rectangles at 3.5”x8”. Because the ratio of the rectangle is 1:3, greater than 1:2, add just 2” to the long side.
Step 3
Place rectangle pairs right sides together. Draw a diagonal line on the back side of the top fabric in the opposite direction the HRT will be oriented.
Step 4
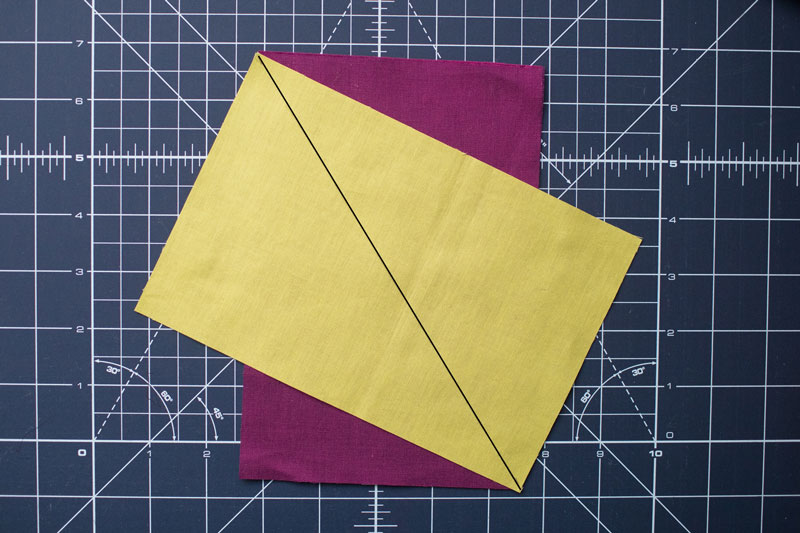
Rotate the top rectangle ¼ turn and match corners. Check orientation by holding in place and flipping back a free corner.
Step 5
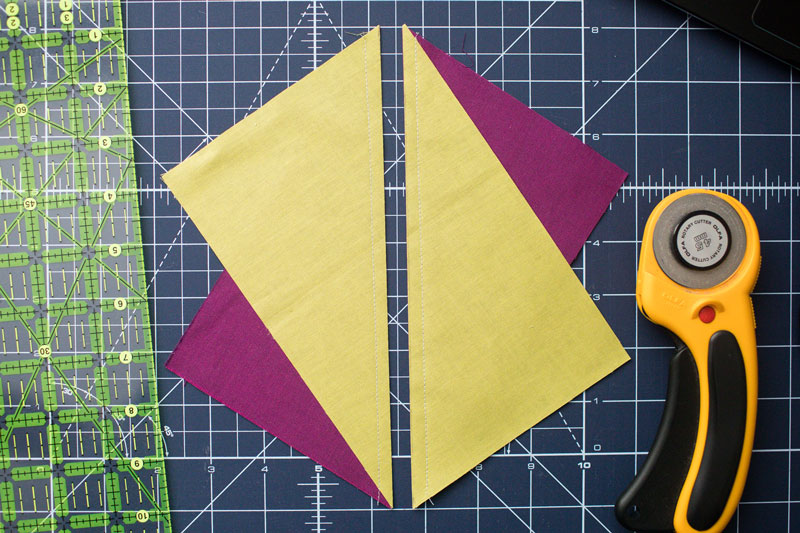
Stitch ¼” on either side of the drawn line.
Step 6
Cut on line and press open. You will have 2 identical HRTs.
Step 7
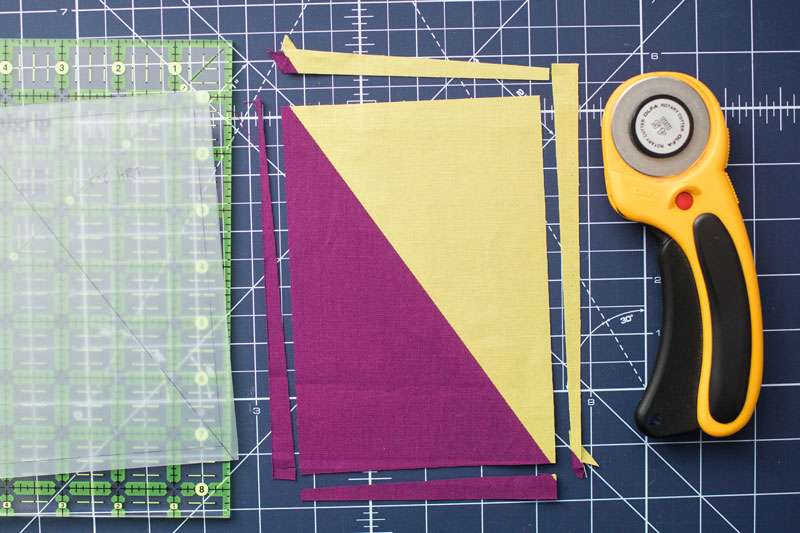
Align the template diagonal line with the diagonal seam. Trim excess fabric from around edges of template.
This year the BoulderMQG is participating in a quilted postcard swap. We will be sending quilted postcards through the mail to some new pen pals in another modern guild. Below we are providing a simple tutorial on how to make a quilted postcard that should travel safely through the mail.
First, a few notes on mailing postcards. According to the USPS minimum postcard size is 5”x3.5”, and should not exceed 6”x4.25”. With these measurements you will be able to use the postcard postage rate. You will also need to keep the thickness less than .016”. Your postcard needs to be rigid in order to feed through the postal machine. In our tutorial we will be using cardstock as backing. We are providing instructions to make a 6”x4” postcard.
Step 1
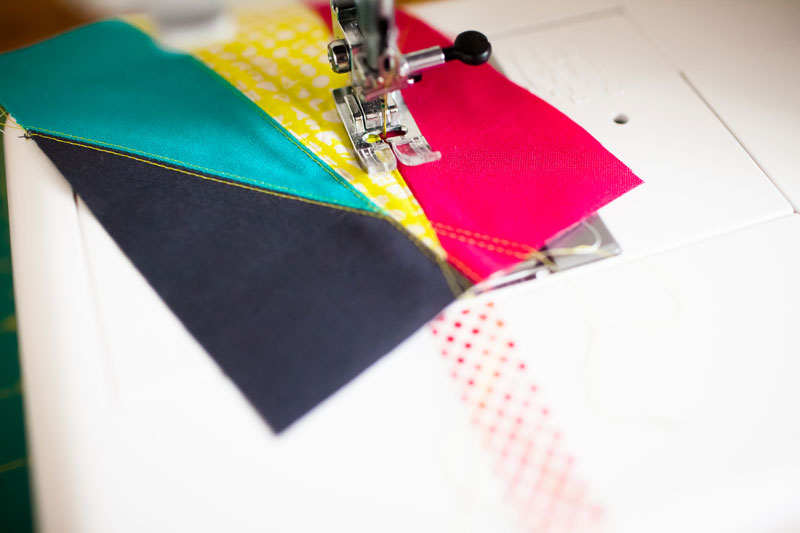
Piece a “quilt top” at the finished size 6”x4”. Please make sure to create a modern style quilt using modern quilt shop quality fabrics.
Step 2
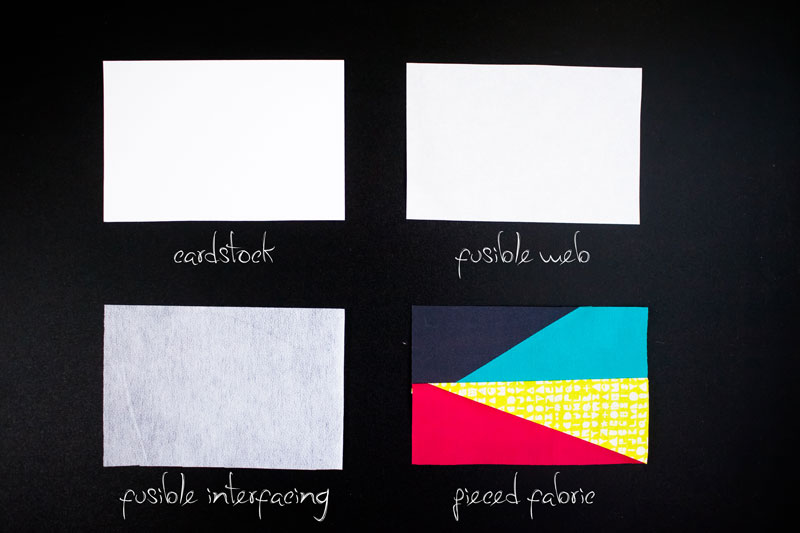
Cut one each at 6”x4” of white cardstock, double sided fusible web (like Wonder-Under or Steam-a-Seam), lightweight fusible interfacing, and your pieced “quilt top”
Step 3
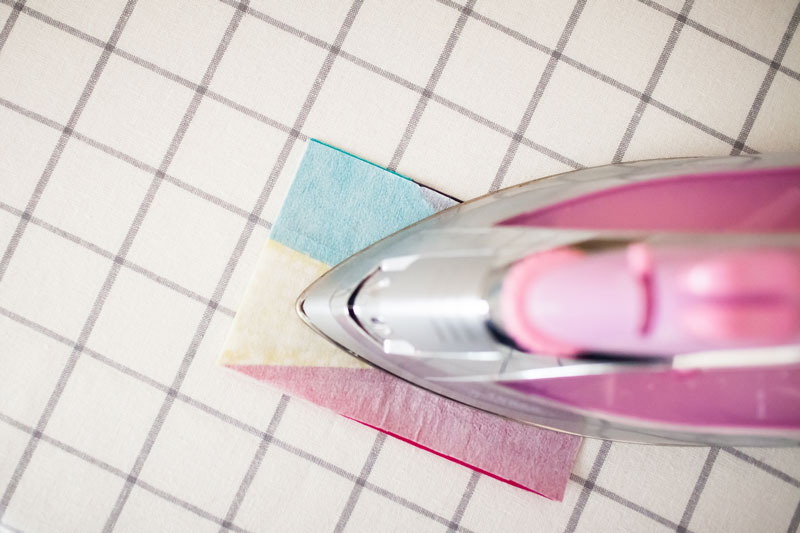
Press the lightweight fusible interfacing to the “quilt top” – wrong side to fusible side.
Step 4
Quilt the layered quilt top + interfacing that have been fused together. Use any type of modern quilting style. Note that more dense quilting may shrink the size of the top. To avoid this you can make your top slightly big and trim it to the correct size after quilting.
Step 5
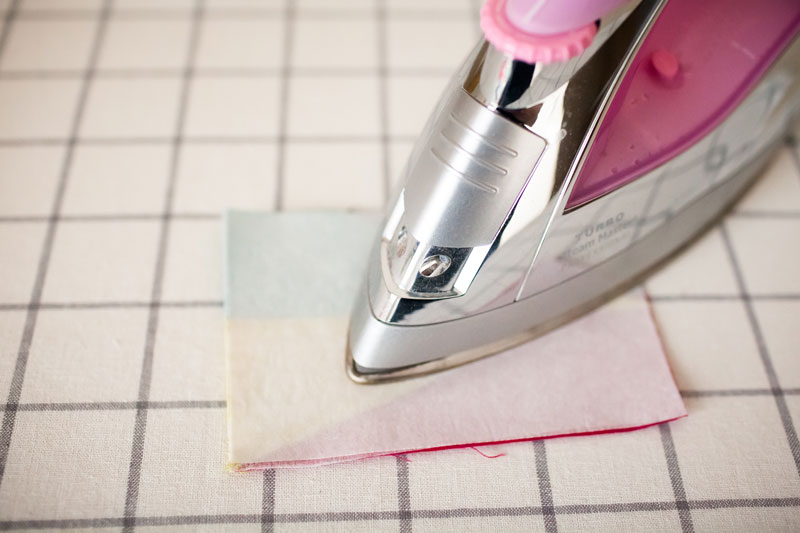
Peel off one side of the paper on the fusible web. Press onto the back of the quilted top – back side to exposed fusible.
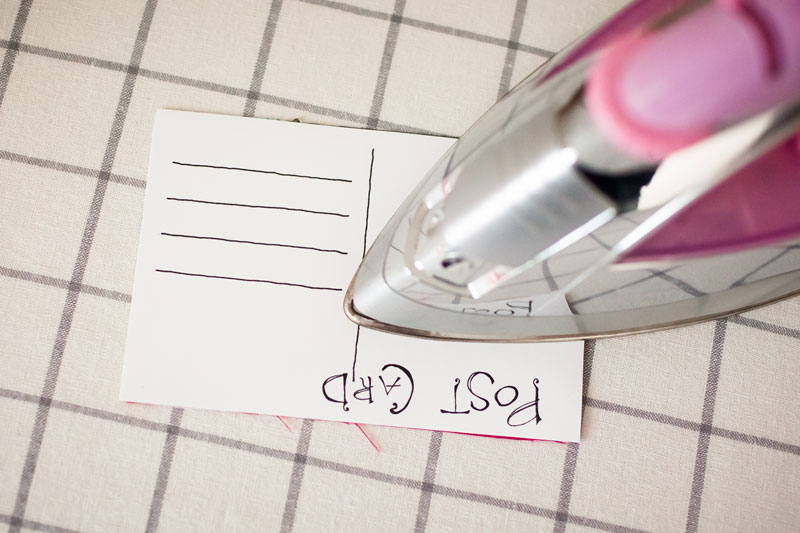
Step 6
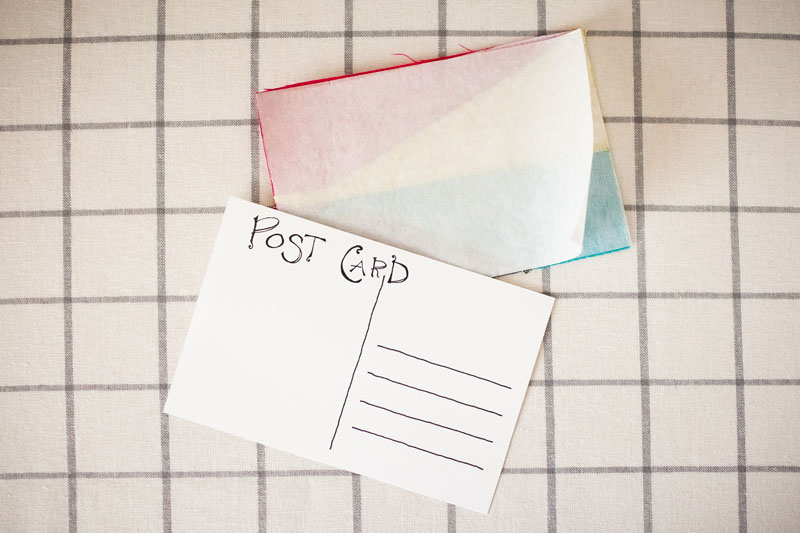
On one side of the cardstock draw a center line. Write “postcard” across the top. Make sure to leave room for a stamp and address.
Step 7
Peel the paper off the back of the fusible on the quilted top. Align the back of the cardstock with the fusible side of the quilted top.
Step 8
Press to fuse the cardstock and the quilted top together.
Step 9
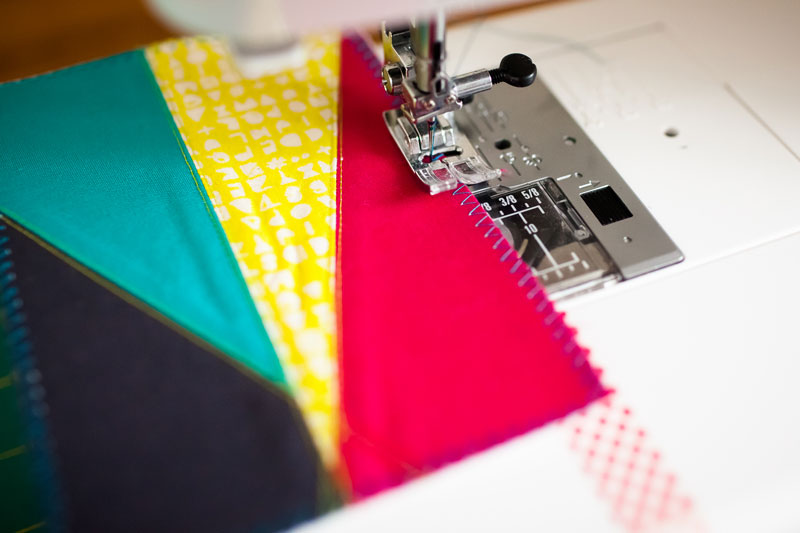
Zig-Zag stitch around all edges twice.
Step 10
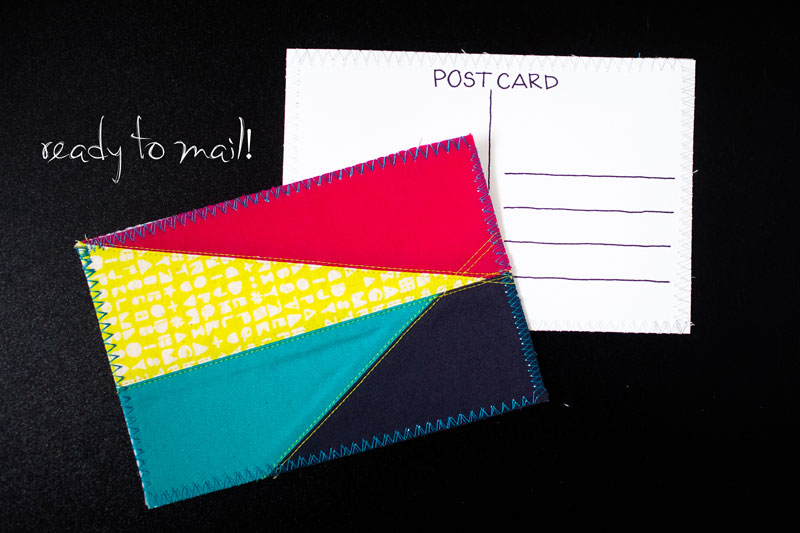
Write a message to your swap partner and address your postcard. Your postcard is ready to mail! BoulderMQG will be providing postcard stamps for our 2019 swap. If your postcard is too large or too thick, you will need to provide your own envelope and standard postage.
Make sure you show off your quilted postcards using #mqgpostcardswap Swap sign ups are being accepted through June 30, 2019.
Every month for the rest of the year we will be doing a fabric selection challenge based on a preselected theme. To play along, you just need to pull a selection of fabrics from your stash and post a photo using the hashtag #bouldermqgfabricpull – you don’t even need to make anything (but you might want to)!
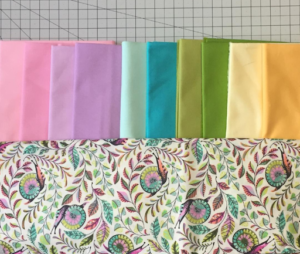
For the month of April, the theme is “spring pastels.” The interpretation of “pastel” is definitely a little loose in this post, since my stash is pastel challenged.
This month I would like to walk you through my fabric selection process step-by-step. This isn’t the last word on fabric pulls (there are so many ways to do this!), but it works for me. For this pull, I’ve once again chosen a centerpiece fabric to serve and an anchor to bring all the colors together. This month, it is Tula Pink’s Slow and Steady Pit Crew Snails.
If you know me, you know I rarely use solids in my quilting and I generally jump in to my fabric pulls without a stop in solidsville. However, solids do not distract the eye in the process of color matching, so I’ve use them here as an approachable path to pattern matching. It also helps that most of my pastels in my stash are in the form of solids!
Step 1:
The first thing I do is isolate the color scheme used in the main fabric. This is a really effective way to create a color story in your quilt – most fabric designers use color in a very intentional way. If the fabric speaks to you with a certain voice, there’s a good chance that a fabric pull with coordinating colors will also have a story to tell. If you will be adding fabrics to this pull after the first step, you can choose colors that all have roughly the same value, since you will be adding depth in the next steps. However, if you are going to stop after step 1, you would want to make sure that your coordinating fabrics all have varying values so that your quilt does not appear flat.
You could easily go with this small pull as your full color scheme, there’s no need to go further.
Step 2:
Select a fabric that has a value darker or lighter for each of your coordinating fabrics to add to the mix. It doesn’t matter if this color is represented in the original fabric or not because your color choices are anchored to your main fabric by your initial pull. Notice how bringing in a shade darker for each hue has made it possible to see the shading and depth in the centerpiece fabric, it really brings it to life when you compare it to the pull that has a more flat value in step 1.
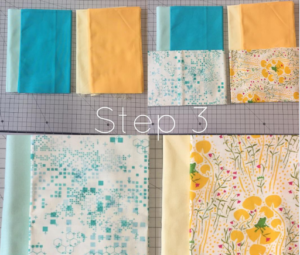
Step 3:
Now it’s time to add prints! Replace your second solid with a print that contains the same tint/shade that you’ve added in step 2 (darker or lighter than your first selection in each hue). Replacing with the low volume prints of the same value have changed the character of the pull and given it more of an overall pastel feeling. Note: for most of my pulls, I eliminate step 1 & 2 and move straight on to step 3 and pull prints without stopping by any solids.
Step 4:
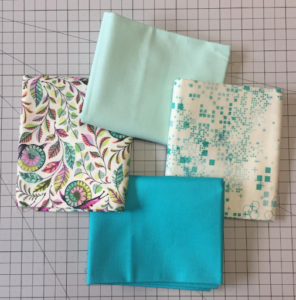
(Optional) You can test out your fabrics one color range at a time to see if you like how they play together. Again, you could use this smaller pull for a block or a full quilt if this speaks to you.
Step 5:
Audition your fabric pull together to see if you are happy with it once you’ve finished your color-focused mini-pulls! This is where you might change out a color that stands out as not belonging in the quilt. If I had a lighter one on hand or wanted to purchase fabric, I might reduce the brightness of the Kona green and look for a more blue-purple Kona. However, I’m pretty happy with this as it is!
We’d love to see your fabric pulls! Make sure you’re sharing them on Instagram using #bouldermqgfabricpull
We’ve finally made it! After completing this block you will have 12 blocks that will finish at 12” each. Congratulations on making it to the end. Next week we will have our final post on assembling your BOM quilt!
Our December block is a nice and easy block featuring HST units. Please reference our paired HST tutorial for detailed instructions.
We recommend using 5 fabrics.
Step 1
Cut pieces from your chosen fabrics.
Fabric A – White:
(8) 4” squares for HST units
Fabric B:
(2) 4” squares for HST units
Fabric C:
(2) 4” squares for HST units
Fabric D:
(2) 4” squares for HST units
Fabric E:
(2) 4” squares for HST units
Units needed for December block:
(4) 3.5” A/B HST units
(4) 3.5” A/C HST units
(4) 3.5” A/D HST units
(4) 3.5” A/E HST units
Step 2
Assemble (2) pairs each of A/B, A/C, A/D, and A/E HST units. Trim to 3.5”.
Assemble block in rows or quadrants. This is a standard 16-patch construction.
Step 5
Trim block to 12.5” square.
Boulder MQG members can download a PDF of the pattern in the member area.
Play along with us and make sure you share your blocks so we can see your progress! On Instagram use #bouldermqgbom18 and tag us @bouldermqg On Facebook share your blocks on the Boulder Modern Quilt Guild page.We may even share your blocks on our blog, Facebook, or Instagram!
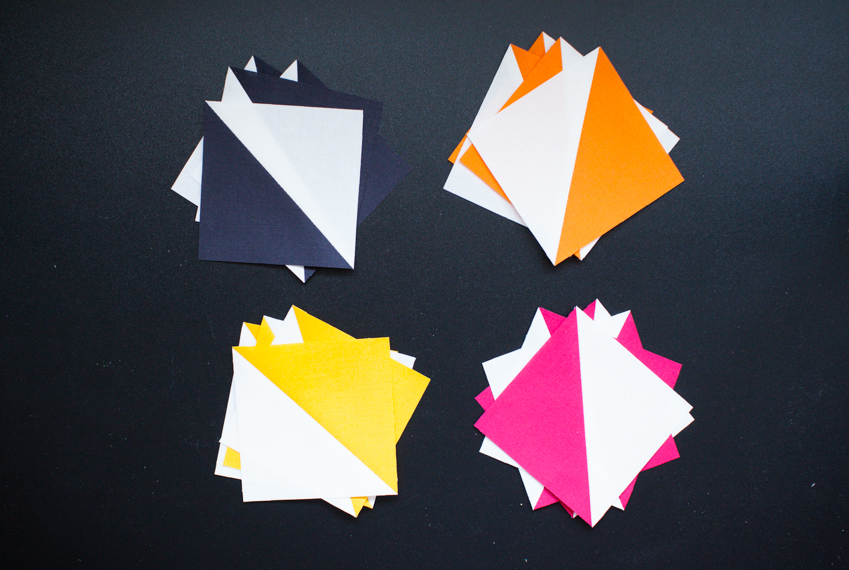
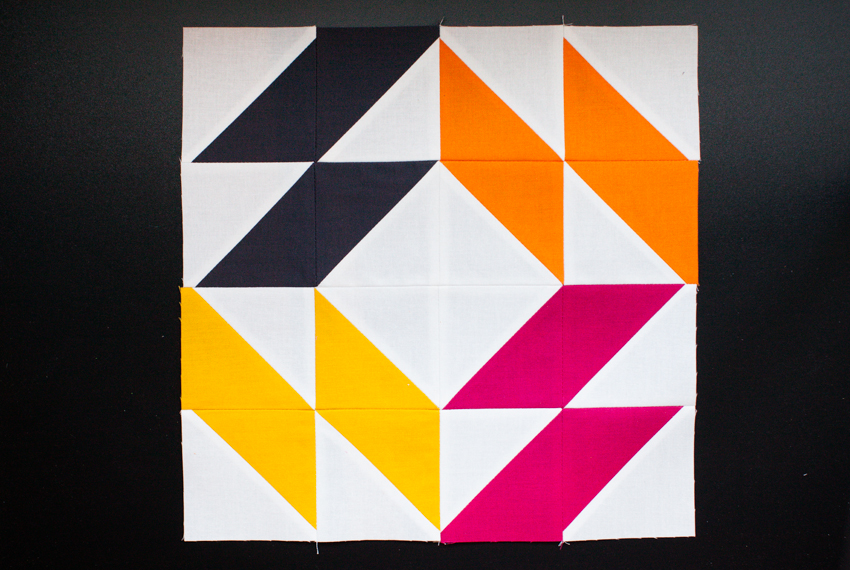
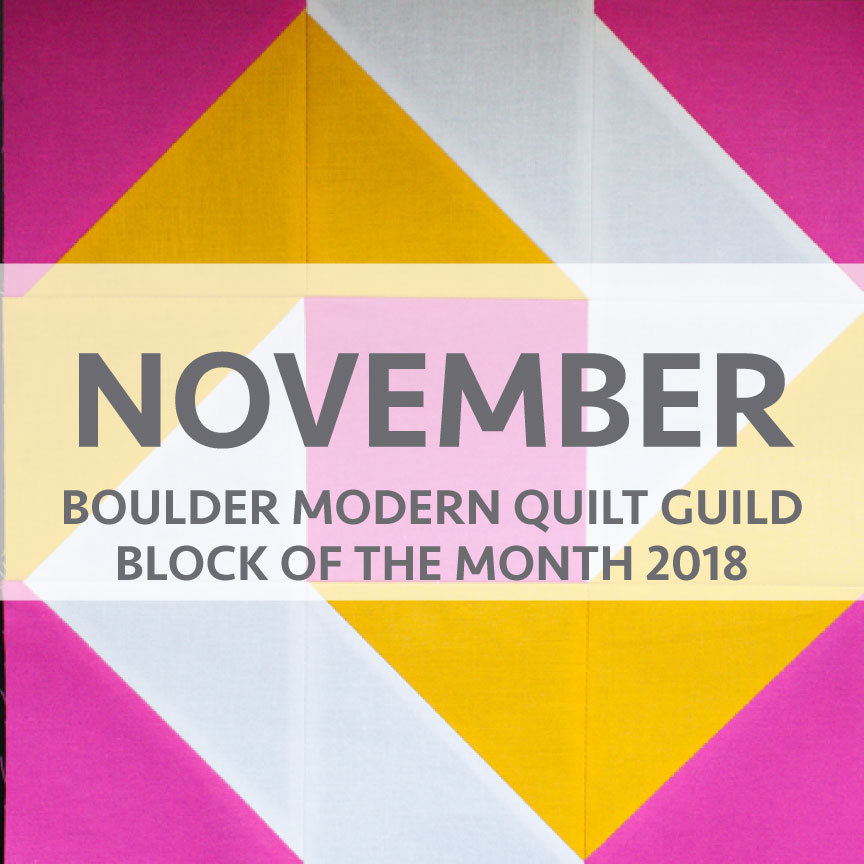
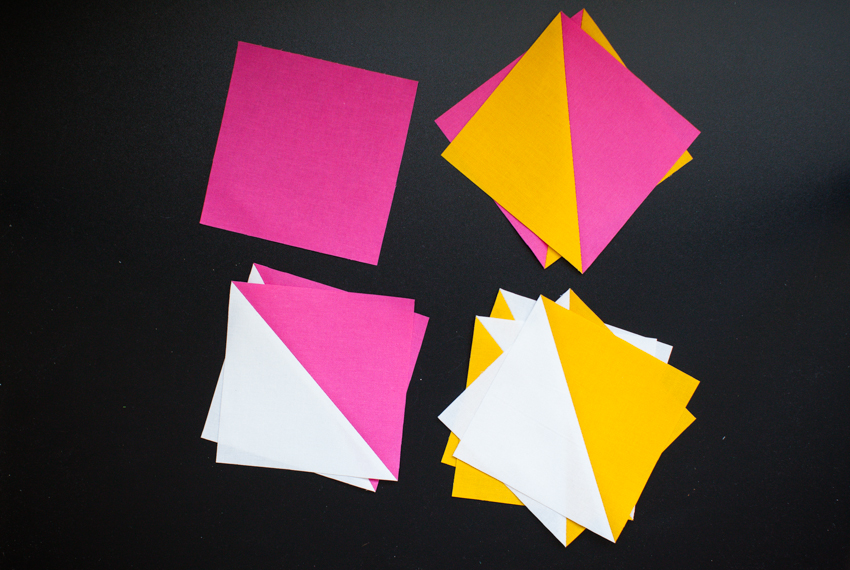
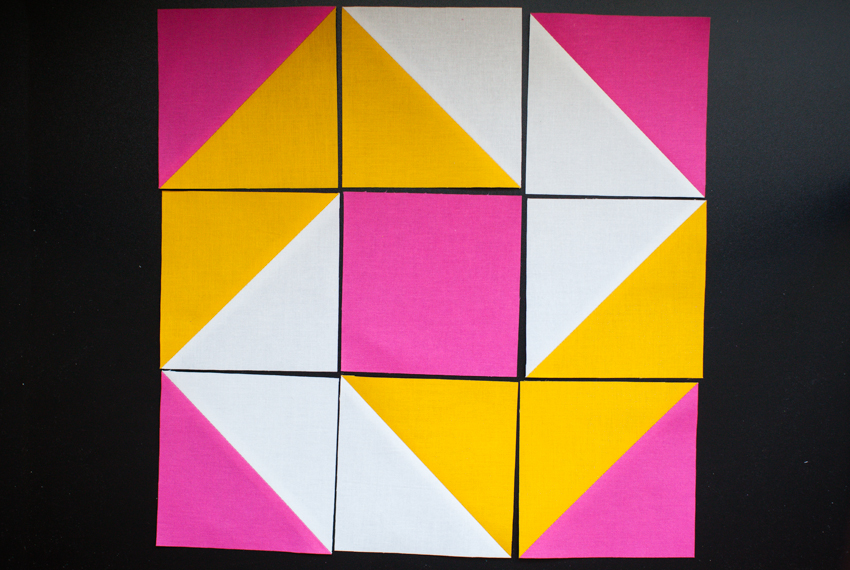
Our November block is a quick and easy Zigzag Path. This block uses a single center square and HST units. Please reference our paired HST tutorial for detailed instructions.
We recommend using at least 3 fabrics. If you need help planning out your colors, you can download a coloring sheet for the whole quilt here.
Step 1
Cut pieces from your chosen fabrics.
Fabric A (white):
(3) 5” squares for HST units
Fabric B (yellow):
(3) 5” squares for HST units
Fabric C (pink):
(2) 5” squares for HST units
(1) 4.5” square
Units needed for Zigzag Path block:
(2) 4.5” A/C HST units
(2) 4.5” B/C HST units
(4) 4.5” A/B HST units
(1) C 4.5” square
Step 2
Assemble (1) pair A/C, (1) pair B/C, and (2) pairs A/B HST units from 5” squares. Trim to 4.5”.
Assemble block in rows. This is a standard 9-patch construction.
Step 5
Trim block to 12.5” square.
Play along with us and make sure you share your blocks so we can see your progress! On Instagram use #bouldermqgbom18 and tag us @bouldermqg On Facebook share your blocks on the Boulder Modern Quilt Guild page.We may even share your blocks on our blog, Facebook, or Instagram!


