An Exploration in Sustainable Modern Quilting BMQG Juror Introductions

We are excited to introduce to you our Boulder Modern Quilt guild volunteer jurors. These women, along with our guest juror Stephanie Ruyle, whom we introduced earlier, will be the jury panel for our show An Exploration in Sustainable Modern Quilting. The show will hang at CU Boulder beginning October 4, 2018. Our jurors come from a diverse background in quilting and sustainable practices.

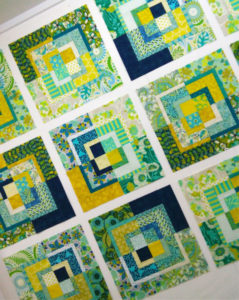
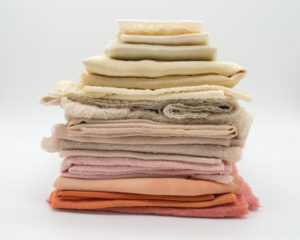
Anne has been taking advantage of the beautiful fabrics in her collection and is currently assembling a stunning quilt.

Anne Deister is a founding member of the BoulderMQG. She has exhibited quilts at QuiltCon, Quilt Festival Houston and Chicago, and the Rocky Mountain Quilt Museum. Her work has also been published in several magazines. As a graphic designer, Anne’s favorite part of the quilting process is in the designing. She creates quilt patterns under the name Springleaf Studios. You can see more of her work by visiting her blog www.springleafstudios.com and on Instagram @springleafstudios

Anne’s thoughts on sustainable quilting;  

“Color and the pattern in fabrics is what drew me into quilting nearly 20 years ago and has led to accumulating quite a stash. The idea of sustainable quilting has encouraged me to reevaluate my choices and make better use of what I already have rather than collecting more. On a different note, I have always been interested in family history and legacy. Sustainable quilting provides a means of preserving and honoring the past in a very tangible and relevant way. I look forward to exploring and making more meaningful and thoughtful work while consuming less.”

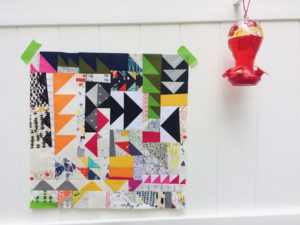
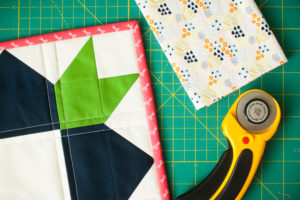
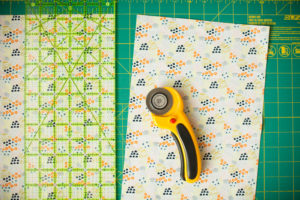
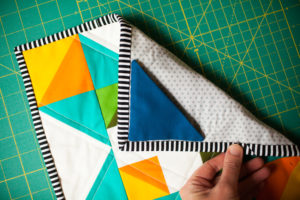
Laura created a mini quilt top using just orphaned block scraps from the construction of blocks for her BoulderMQG block of the month quilt tops; these would have otherwise been thrown away.

Laura Loewen is the current Vice President and Education Committee Chairperson of the Boulder Modern Quilt Guild. She has been quilting off and on for 20+ years, beginning in 4H and most recently becoming more active with the Modern Quilt Guild. Laura has been a member of BoulderMQG for 2 years and was previously a member of the DallasMQG.

What Laura has discovered about sustainable quilting;

“Sustainable quilting can take on many forms for each individual. Some people will realize they enjoy making with repurposed materials, or completing or repairing quilts passed through generations of their family. Sustainable quilting to me means I have become more mindful and intentional with sewing. I have started doing more handwork and hand quilting which keeps me from becoming a quilt generating machine. It lengthens my production time, therefore, slowing my material and energy consumption. And I have consciously decided to embrace my fabric stash and use what I have; only purchasing a select few fabrics as needed. Thinking through what sustainable quilting means to me has refreshed my happiness with this hobby.”

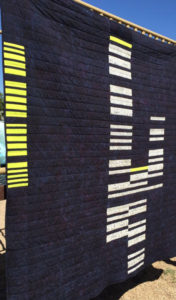
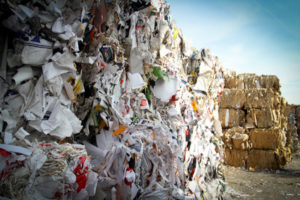
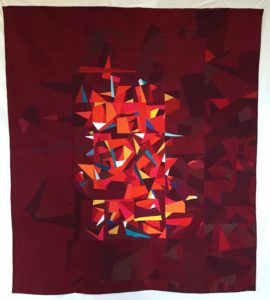
Shelly’s expertise in modern quilting is incorporating repurposed and reclaimed materials into her quilt designs. This is her Morse Code quilt.

Shelly Sommer came to quilting in 2015, when a vision for a big project sprang into her mind and wouldn’t be evicted without getting made. Shelly focuses on large-scale (one-block) quilts, drawing inspiration from print materials and the tactile qualities of fabrics. Because her day job involves working closely with climate and environmental scientists, sustainability has taken on a particular, personal meaning for her. She has been a member of the Boulder MQG for three years.

Sustainable quilting has great importance for Shelly;

“Even though a big part of my day job is about sustainable behavior, I had to learn the basics all over again when I started quilting and sewing. I love using reclaimed fabric and that’s a very visible part of my quilts, but in the end that breaks down to rethinking why I make quilts, my relationship with consuming and stashing, and what it means to honor my materials. For me, modern quilting really resonates with sustainability, since modernism is all about stripping away the unessential and bringing out the true character of what you’re doing.”


Please join us for our opening reception on October 4 at 6pm. An Exploration in Sustainable Modern Quilting is presented by the Boulder Modern Quilt Guild and the Sustainability, Energy and Environment Community, University of Colorado Boulder; sponsored by Albert A. Bartlett Science Communication Center, 4001 Discovery Drive, Boulder, CO.


Tips on Photographing a Quilt for Show Submission

Tips on Photographing a Quilt for Show Submission

by Laura Loewen

You’ve spent hours making your quilt and now it’s time to submit to a show. Photographing your quilt for digital submission may be the most important step. A good, or bad, photograph may make the difference if your quilt is selected or not for the show you are entering. 

You don’t need a professional grade camera to take a great photograph of your quilt. You just need a little TLC when it comes to creating a photo shoot for your masterpiece. We all love seeing quilts in the wild and put into interesting compositions on social media like Instagram and Facebook. However, the tips below will help you create simple, clean photographs that are best for submitting when entering a quilt show.

TIP 1 – LEAVE TIME FOR PHOTOS

Set yourself a deadline before the entry deadline. Leave yourself time after finishing your quilt to take the photographs that you want and need for submission. If you know you only have time on the weekend, make sure to schedule it. Also, if you know you don’t have an indoor space available with good light, make sure you leave room for any inclement weather delays.

TIP 2 – TAKE THE PHOTO

Use the camera you have! Almost everyone has a camera in their purse or pocket these days. You don’t need a professional camera to make a great photo. Make sure your camera lens is clean and free of dirt or fingerprints that could obscure the image. 

TIP 3 – LIGHTING 

Use daylight for the best results. Select a place outside, or inside near a large door or window, that is not in direct sunlight. An overcast day or a bright shady spot is best. Be aware of the angle of sunlight and any shadows that may be created.

For my photo shoot, I set up on the north side of my husband’s office building. Make sure you have permission to take photos in your selected location. Note; the train tracks next to this building span approximately 100 yards and are not connected to any other tracks. NEVER take photos on active train tracks.

Make sure the light source is not coming from behind the quilt or you could end up with sun flare. This is a nice effect when taking casual or artistic photos but it is not desirable for submission photos.

Master tip:

If you don’t have access to daylight, or have issues with weather, you can create a lighted indoor space using utility lamps and daylight temperature light bulbs. Try hanging large sheets of sheer white fabric in front of the utility lamps to diffuse the light or reflecting it off of a pure white wall or poster boards. Be careful not to get objects to close to lamps and start a fire.

TIP 4 – HANGING 

Hang the quilt straight. If the show requires a sleeve, you’ve already got a nice way to hang your quilt. Otherwise, tack it to the side of a building or use strips of fabric and safety pins to create tab tops on the back to hang the quilt from. You can use a photo backdrop rig, or just as easily use a dowel rod or curtain rod with a couple friends to hold it up.

Master tip:

Make sure to check that the bottom of the quilt is also hanging square. You may need to tack the bottom corners in place or use fabric tabs secured with safety pins to pull the corners out, somewhat like you would stake out a tent.

TIP 5 – THE MONEY SHOT

You will almost always need to submit a full, overall photograph of your quilt. Stand square to your quilt with camera lens centered on the quilt center. Look through your viewfinder or at your screen and try to square up the edges of your quilt with the edges of your screen. If you see distortion on the screen, it will show up on the photo.

Wide angle lenses will create more distortion. However, most consumer cameras, including phone cameras, do not offer a high resolution zoom option. It is most likely just cropping the image and not actually gathering more data. Try stepping away slightly if you see too much distortion because it will likely occur closer to the edges. You can crop the image yourself in post processing; don’t let the camera crop it by zooming.

TIP 6 – TAKE MORE PHOTOS

Some shows request multiple photos of your quilt. Don’t forget to get detail shots of the quilting and the piecing. You can take more artistic freedom with angles and composition for detail photos. Make sure you are still aware of your light source and any bright spots or shadows that may be created.

If multiple photos are accepted for show submission, this is when you may want to show off something more artistic like a draped or folded quilt photo. Be sure to carefully read any show submission guidelines.

TIP 7 – POST PROCESSING IS A MUST

Your computer probably came with basic editing software that allows you to crop your photo and do some minor adjustments. A decent free program you can download to your computer if you want to do basic edits is Irfanview.

If you are using your phone to take photographs and want to edit right on your phone, I like the app VSCO. The basic editing options are free. I do not recommend using preexisting filters.

TIP 8 – EDITING YOUR PHOTOGRAPHS 

The three most important things to focus on when post processing your photos are, crop (showing only what you want to show), color (how true do the colors read), and exposure (how bright it is).

Exposure is important to show the quilt in the right light (pun intended). Make sure your whites look white and not grayed out or dingy. I have found that most images are underexposed and need the exposure increased. Make sure you don’t blow out the details in white areas of your quilt by upping the exposure too much.

Color correction is known as white balance. Generally, our camera will do it’s best to auto balance the colors but sometimes when photographing in shadow light our images may look a little blue. Warm the white balance by turning up the temperature. Whites should look white and not blue.

For cropping your overall photograph, I recommend cropping the image as close to the binding as possible. This removes any distractions from the background and focuses the view on the quilt alone. 

In this example, I am using VSCO editing directly on my phone to edit the quilt photograph.

Master tip:

At the same time, we want to make sure our darkest areas are not appearing lighter than they are supposed to. You can play with contrast a bit to darken the darks and lighten the lights. Be sure to recheck your final exposure setting after changing any contrast settings. 

TIP 9 – HIRE A PROFESSIONAL

If you are submitting for a show that you have worked very hard for, consider hiring a professional. There are many professional photographers, or student photographers who would take a commissioned job. Make sure to ask about usage rights. A photographer may keep the copyright and allow you to use the image(s) as you please, or there may be some restrictions. Remember, the quality of your photographs may be what gets your quilt accepted to the show you are entering.

TIP 10 – HAVE FUN

Lastly, make sure you are having fun. We all quilt for pleasure and entering shows should be the same. Just because our quilt is not selected does not mean our quilt is not well made or skillfully designed. Many shows, like QuiltCon, have so many entries they have to cut a substantial number more quilts than they accept. If entering shows ever becomes not fun, find something new to focus your energy on for awhile and try again in the future!

These tips were a guide for taking quality photos for show submission. You can also use the basic guidelines for lighting and post processing to help with your everyday quilt photos. When you aren’t submitting for a show you have much more freedom to come up with interesting compositions. Photographing quilts in the wild is a popular endeavor seen on social media now. This allows you to showcase not only your quilt, but also the scenery where you have chosen to photograph it. Remember, the goal is just to enjoy making quilts and making photos of them to share. 

Laura Loewen has been sewing since she was 7 years old, and has been quilting for 20 years. After working in interior design in Chicago for many years, she attended Rocky Mountain School of Photography in Missoula, Montana to become a photographer. She owns her own photography business, Loewen Images, and is an active member and 2018 Vice President of Boulder Modern Quilt Guild.

Sustainable Fabric Disposal Options

Sustainable Fabric Disposal Options

Selling Your Fabric

Wooden Spools in Englewood buys fabric, though their website with the buying details is currently down. This is a good option to recoup some of the money spent on larger cuts of quilt shop quality fabrics. Craft Scraps in Littleton buys quilting fabric by the pound. However, an appointment is required for all sales and there is a ½ yard minimum. For the full list of requirements, click here. The Craft Box in Wheat Ridge purchases supplies by appointment. There are many restrictions on their buying, so make sure to read through all the rules. The Hidden Treasure in Longmont accepts craft donations or will sell your items on consignment. You can see the full policies here.

Donating Your Fabric

RAFT Colorado in Denver is a reuse center specifically for teachers. They accept fabric as well as many other craft materials, you can find the full list and drop off hours here. Art Parts in Boulder is a nonprofit creative reuse center that accepts donations most Fridays and Saturdays, but make sure to check the website to make sure there isn’t a donation hiatus. View all the rules and find out how to get a 10% off coupon when you donate. ReFrame Creative Reuse Center and Makerspace in Denver accepts material donations. ReFrame is a nonprofit committed to providing sustainable, affordable supplies. Check with local schools, libraries, Girl Scout troops… Kids don’t care about the quality of fabric and they can be a great for them to learn to sew. Fabric can also be cut up and used in art projects. It’s worth taking the time and making a few calls to see if these items would actually be useful to the organization, you don’t want to burden them with items they don’t know what to do with. You can also contact with thrift stores to see what their textile donation policies are.  

Recycling Your Fabric

Most H&M stores have a clothing recycling collection bin. You can read the full details of their commitment to recycling fabrics and what they do with the items. USAgain has textile recycling bins in the Denver area where you can drop off clean textiles. Click here to find a bin location. American Textile Recycling Service has donation bins around the area, find locations here. Eco-Cycle CHaRM (Center for Hard-to-Recycle Materials) in Boulder accepts any clean fabrics one square foot or larger for recycling. The full material list and drop off hours are available on their website. Star Industrial Supplies in Denver accepts fabric and clothing that can be resold, reused, or donated. They recycle more than 97% of the textiles they accept and send clothing around the world to be worn again. I could not find donation information on their website, but you can contact them at (303) 295-7737. The Broomfield Recycling Center offers textile fabric for Broomfield residents, but check your local recycling center for recycling details.  

Other Great Options to Consider

Days for Girls creates menstrual kids for girls in developing countries. You can sign up to actually sew the items for the kits, or you could just donate your fabric to a local chapter. They need 100% cotton fabrics that are dark or patterns, but no patterns with animals or people. The pieces should be at least 12″ square. If you have dark flannel, they always need that and have a harder time getting it donated.  Use tiny scraps instead of polyfill stuffing. If you’re making a plush, why not stuff it with those tiny fabric scraps you have from trimming countless HSTs? Or use them to make a dog bed and donate it to an animal shelter.   If you have any resources we haven’t listed, please let us know!  

Quilt Sleeve for Hanging Large Quilts

By Laura Loewen

The BoulderMQG 2018 show, An Exploration in Sustainable Modern Quilting, requires specific hanging attachments for any quilts that are accepted. Be sure that any accepted quilt(s) include the correct attachments for hanging. The following is a tutorial for creating and adding a sleeve to larger quilts. For our show, any quilt measuring wider than 30” will require a sleeve. If a sleeve is not added to your accepted entry we may use other means to hang and display the quilt, such as folding and draping the quilt over a display bar. Please add a sleeve to any quilt larger than 30” wide. However, quilts wider than 60” may still be folded for display because of our space restrictions. Below we provide instructions for adding a sleeve to your quilt after it has been bound.

Adding a Hanging Sleeve After Binding


Step 1

Gather supplies; finished quilt (bound) and fabric to make hanging sleeve.

Step 2

Cut fabric to make sleeve. Piece together if needed.

9.5” Wide X [width of your quilt] Long

Step 3

Press short ends. Fold over ½” and press, fold over again ½” and press.

Step 4

Sew folded ends down.

Step 5

Fold in half lengthwise, wrong sides together. Press to create a center crease.

Unfold and fold one long edge in to the middle lengthwise. Raw edge should run parallel with center crease. Press.

Unfold and fold the other long edge in to the middle lengthwise. Press.

You will create 3 creased folds.

Step 6

Fold on center crease, wrong sides together. Sew ½” seam allowance along raw edge lengthwise creating a tube. Secure ends with backstitch.

Step 7

Minding the existing creases, press seam open. Take care to keep outer creases pressed as they were before sewing the seam.

Step 8

Align center of quilt with center of sleeve tube. Keep the seam side down, hiding the raw edges. Pin top crease of sleeve running parallel to the top edge of quilt; approximately ½”-¾” from top edge, just inside binding. Align creases so the tube is dimensional away from the quilt. The back of the quilt will be flush with the back of the sleeve. Pin the sleeve to the quilt along the bottom crease.

Step 9

Hand sew along both the top and bottom edge of sleeve. At the sides of the sleeve, stitch down only one layer keeping a tube opening. Take care to only stitch through the quilt backing and not through the front of the quilt.

Step 10

Remove pins after finishing stitching sleeve down.


Your finished sleeve should be dimensional to allow for our hanging hardware. It should stay completely hidden behind the edges of the quilt when it is hung.


Submissions for An Exploration in Sustainable Modern Quilting will be accepted through September 1, 2018. If your quilt is smaller than 30″ it will need corner triangles for hanging, please see the corner triangle tutorial.

Corner Triangles for Hanging Small Quilts

By Laura Loewen

If you have entered a quilt into the BoulderMQG 2018 show, An Exploration in Sustainable Modern Quilting, then you will need to be sure that any accepted quilt(s) include the correct attachments for hanging. The following is a tutorial for creating and adding corner triangles to small quilts. For our show, any quilt measuring 30” wide or less will require corner triangles. If these triangles are not added to your accepted entry we may use other means to hang and display the quilt, such as safety pins or Command adhesive. Below we provide instructions for both adding corner triangles before or after binding or facing your quilt.

Adding Corner Triangles Before Binding

Method shown for hand finished binding.

Step 1

Gather supplies; quilt ready to bind, prepared binding, (2) 3.5” squares to make corner triangles.


Step 2

Press squares diagonally; RIGHT SIDES OUT.

Step 3

Pin triangles on back side of quilt at TOP corners.


Step 4

Sew binding on to front side of quilt as you normally would. Take care not to sew over pins on corner triangles.

Your binding will look normal on the front. The back will have your corner triangles secured by the machine stitching.


Step 5

Clip, or pin, binding to prepare for hand stitching it down.

Step 6

Hand sew binding down all the way around. Take care to go through 3 layers (2 layers of corner triangle, plus quilt backing fabric) when stitching at corner triangles.


Your finished corner triangles will create small pockets that will be used to help us hang your quilt should it be accepted to the show.

Adding Corner Triangles After Binding (or for faced quilts)


Step 1

Gather supplies; finished and bound quilt, (2) 4.5” squares.


Step 2

Press squares diagonally; RIGHT SIDES TOGETHER.

Step 3

Keeping right sides together, pin approximately 2” apart along one raw edge side. This will be where you leave an opening for turning right sides out.


Step 4

Sew along raw edges ¼” seam, leaving area between pins open. Clip all corners.

Step 5

Turn right sides out. Press. Take care to fold in raw edges at opening.


Step 6

Pin in place on TOP corners of quilt. When applying to a traditionally bound quilt, match edges just inside edge of binding. When applying to a faced quilt, depending on the width of the facing, you may need to overlap the facing. Take care to keep away from quilt edges in order to not show on the front.

Step 7

Hand stitch along the edges of the corner triangle that run parallel with the quilt edges. Take care to stitch through all layers (quilt backing, plus all layers of corner triangle) at the opening used to turn the corner triangle.


Your finished corner triangles will create small pockets that will be used to help us hang your quilt should it be accepted to the show.

Submissions for An Exploration in Sustainable Modern Quilting will be accepted through September 1, 2018. If your quilt is larger than 30″ it will need a hanging sleeve, that tutorial will be posted in the coming weeks. 

Introducing Stephanie Ruyle – Guest Juror

Introducing Stephanie Ruyle – Guest Juror

An Exploration in Sustainable Modern Quilting is a a juried gallery show from the Boulder Modern Quilt Guild and the Sustainability, Energy and Environment Community at University of Colorado Boulder. The vision for An Exploration in Sustainable Modern Quilting is to challenge quilters and our community to view and interpret what a modern quilt is and apply sustainable, environmentally friendly, materials and practices to create a functional quilt. 

The Boulder MQG is thrilled to have Stephanie Ruyle as a guest juror and today we are introducing you to her and her amazing work. Stephanie blogs at Spontaneous Threads and creates many quilts with sustainable fabrics. We asked her to share with us how she got started with sustainable quilting, here’s what she told us:

Part of the process leading up to the show is to reflect upon and think about sustainable quilting practices as well as to put together some of these thoughts and share some ideas for sustainable quilting/creating. 

 
This discussion dovetails nicely with a discussion started, and continued by Scarlet Kumquat  and others, about the waste generated by quilters, here in the US and abroad in the textile factories that manufacture the fabrics we use to make our quilts and our clothing. 

Coming to quilting from garment sewing, I have been keenly aware of the fabric waste in garment sewing and have for many years devised my own pattern hacks to keep the amount of yardage used in the construction of a garment to a minimum. I have also done that with quilting, creating one of my best known quilts, “Embers”, entirely from the scrap waste of 2 other quilts. Recently I have challenged myself to be thoughtful with all the sewing that I do. It is quite fulfilling to find only selvedges remaining at the end of a project, and even those do not go unused. 
 
 “My thoughts on Sustainable Modern Quilting” highlights some additional ways in which we can all contribute to this timely and important discussion.  If we make it a priority to take time to consider and plan for the “life” of our creations, even when just practicing new skills, we can make a huge and impactful difference.”
Make sure to head over to Spontaneous Threads to Read Stephanie’s thoughts on Modern Sustainable Quilting. And follow her over at Instagram.